Set Up an Event Signup and Reminder with Gravity Forms and Mailchimp
A client asked me to look into event plugins where we can set up a signup form for a webinar he plans to give soon. I did some research, but couldn’t find any (including the popular commercial plugins) that would let us automatically send out a reminder email a few days before the webinar; this was a surprisingly non-existent feature.
So… automation is something that Mailchimp excels at. We were already using Gravity Forms and Mailchimp on his website – it wasn’t a big step to use them together to make our own event signup and reminder tool. I had to write up documentation for him, and am sharing it here.
Here’s what I did…
1. Make a new list in Mailchimp to collect subscribers for your event.
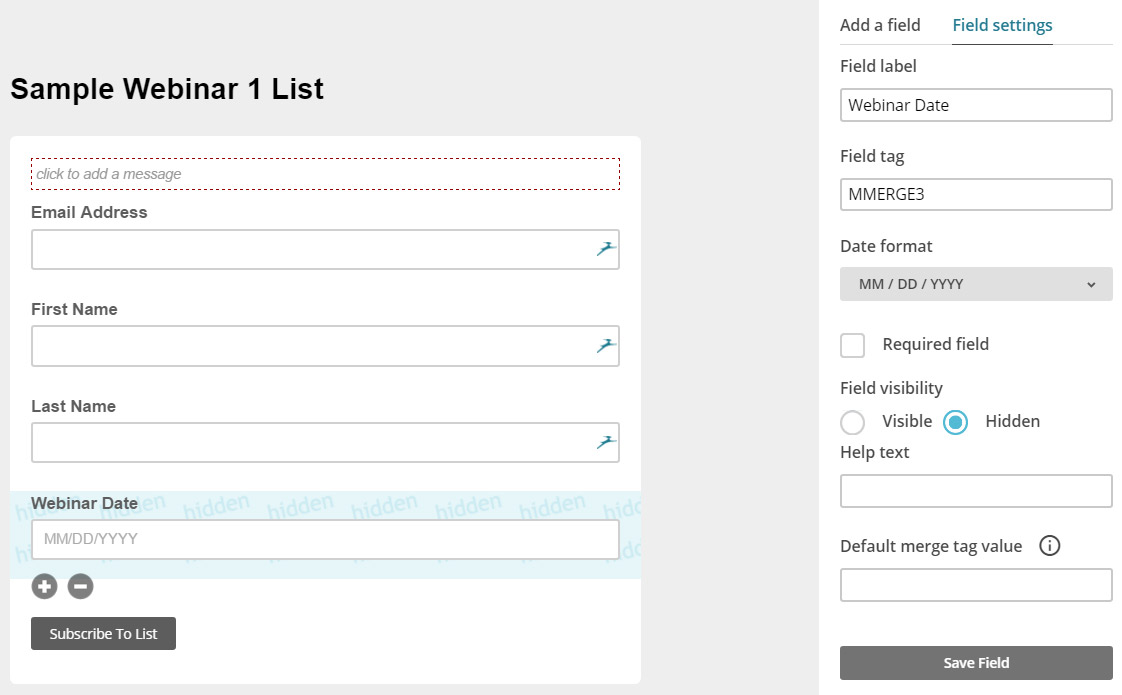
When you create your list, you’ll need to add a hidden Date field to the default signup form. To do that, go to Signup Forms and open General Forms. You’ll see the default form with First Name, Last Name and Email Address.
Click on Date in the right menu and the field will be added to the form. Click the field and in the Field Settings to the right, add a Field Label and tick the Hidden circle under Field Visibility, then click Save Field. See below for an example.
2. Make a new form in Gravity Forms for your event signup (let’s say you’re also having your own webinar).
 Your form needs to contain these fields (keep it simple and don’t ask for more than this): First Name, Last Name, Email, and Event Date. The first three will need to be required, but the last one, you’ll set as a Hidden Field, and you’ll put in the date of your webinar.
To hide the date field go to the Advanced tab and click ‘Hidden’ under Visibility. This is the trigger that will drive your automation. See the example at right…
3. Connect your new form to your new Mailchimp list.
Assuming you’ve already installed the Mailchimp addon for Gravity Forms, go to Settings > Mailchimp in the form editor. Add a new feed, name it as you like, match the dropdown field names between the form and the list, and select Double Opt-In if it’s not already selected (this asks the recipient to confirm they really want to be added to your list of subscribers). Then click Update Settings at the bottom.
4. Add your Gravity Form to a page or post on your site.
This is as simple as clicking the Add Form icon in the menu. Choose the new form and place it where you want it – this is where people will sign up for your webinar. Don’t forget to add content describing your event – the date, time, location or URL, topic, etc.
This is a good time for an initial test – try signing up and see what happens. You should receive an opt-in notice, and in Mailchimp you should see 1 new subscriber for your list.
Okay – now we’re mostly set up. People can sign up for your webinar on your website and they’re automatically added to your new mailing list at Mailchimp, after they approve the confirmation email they receive. Now we need to set up the automation.
5. Go back to Mailchimp and click Automation.
There are a ton of automation options, but we want to go to Date-based and choose Specific Date. Give your new automation a name and choose your mailing list.
To keep this simple, we’ll use just one Trigger. You can set up any number of emails though – like maybe one to follow up the day after your event. Delete the second and third triggers and click Edit Trigger for the first one. Change the number of days to whatever you like and click Update Trigger.
Then click Design Email. You’ll be shown the available templates – choose whatever you like, but just remember to do the test to see how it looks in a phone. Add a subject line that will get attention – “Your event starts in 3 days!” or something similar. In your email body you’ll want to edit the title and the content – put in the event date, time, location/URL and any other info to help the attendee.
Then use the built-in test, confirm you like the way it looks in both desktop and phone, and as the last step Start Workflow to set your automation running.
That should do it – you may want to set the number of days to a bigger number to test the autoresponder before you announce your event, just in case.